SharePoint 2010 has made available a very useful type of authentication called Claims based Authentication. You can have a custom identity provider and make your web application use that identity provider in the places of default Windows Authentication. You can also make it use multiple authentication providers. Following are the steps to be followed for configuring a SharePoint 2010 web application to use Claims Based Authentication.
I will use ADFS 2.0 to authenticate users in my domain instead of Windows Authentication.
INSTALL AND CONFIGURE ADFS 2.0
- Install ADFS 2.0 on the server which can authenticate the users.
- Run the ADFS configuration wizard.
- Select create new federation server if you are using this for testing or else select the appropriate option.
- If you plan to use more than one ADFS select New Federation Server Farm else select Stand Alone Server. Click Next
- The wizard automatically picks up a certificate. If it show any error. Go to IIS manager and create a certificate with Fully Qualified Domain Name (FQDN) and run the wizard again.
- Give the credentials for the service account and click next.
CREATE RELYING PARTY TRUST.
- Open the ADFS 2.0 management console and expand on Trust Relations
- Select Relying Party Trust
- Click on Add Relying Party trust.
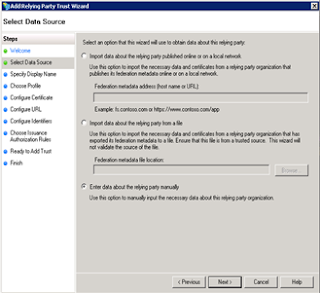
- Select enter data about relying party manually.
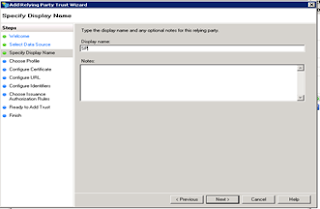
6. Select ADFS 2.0 profile and click next.
7. Selecting a certificate for encryption is optional. Click next.
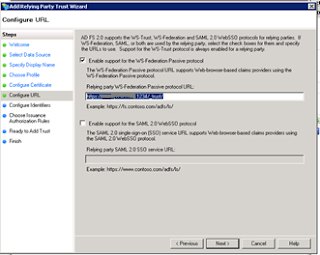
8. Select Enable support for WS-Federation Passive Protocol. Give the url of your web application with /_trust/ at the end
Example (https://servername:port/_trust/)
Note: Do not forget to give the slash “/” at the end after trust (/_trust/)
9. Click next
- Do not add any identifiers. Click next.
- Select permit all users to access this relying party. Click next.
- Verify the configuration and click next at the following screen.
- Leave the check box “Open the edit claim rules dialog…” and click on Close.
- Then click on Add rules.
 15. Select the claim rule template as “Send LDAP attributes as claims”
 16. Give a name for the claim rule. Select Active Directory as attribute store.Click on the dropdown and select SAM Account Name in the LDAP attributeSelect E-Mail address as the outgoing claim type.In the next row select Token Groups – Unqualified Names as LDAP attributeSelect Role as the outgoing claim type.
EXPORT CERTIFICATE
- Open ADFS 2.0 management console.
- Expand Service and select Certificates.
- Right click on Token Signing Certificate and select view certificate.
- In the Certificate windows select Details tab and click on copy to file.

- In the Certificate Export wizard click next.
- Select DER encoded binary X.509 and click next.
- Give a location where you want to save the exported certificate.
- Click on finish.
- Copy this certificate to the server where the SharePoint server is installed.
- Central Admin-> Security -> Manage Trust and click New
- Upload the token signing certificate which you copied from the ADFS server.
Configure a Claims-based Web application
THE CONFIGURATION OF A CLAIMS-BASED SHAREPOINT WEB APPLICATION CAN BE ACHIEVED USING WINDOWS POWERSHELL. THE STEPS TO BE FOLLOWED ARE AS FOLLOWS
- From the Windows Power Shell command prompt (PS C:\>), create an x509Certificate2 object using the following code:
$cert = New-Object System.Security.Cryptography.X509Certificates.X509Certificate2("path to cert file")- Create a claim type mapping to use in your trusted authentication provider using the following code
New-SPClaimTypeMapping "http://schemas.xmlsoap.org/ws/2005/05/identity/claims/emailaddress"-IncomingClaimTypeDisplayName "EmailAddress" –SameAsIncoming- Create a trusted login provider by first creating a value for the realm parameter using the following code
$realm = "https://serevrname:port/_trust/"- Create a value for the signinurl parameter that points to the Security Token Service Web application using the following code
$signinurl = "https://sysname/adfs/ls/”- Create the trusted login provider, using the same IdentifierClaim value as in a claim mapping ($map1.InputClaimType) using the following code.
$ap = New-SPTrustedIdentityTokenIssuer –Name "ClaimsProvider" -Description "My Custom Identity Provider" –Realm $realm -ImportTrustCertificate $cert -ClaimsMappings $map1[,$map2..] –SignInUrl $signinurl -IdentifierClaim $map1.InputClaimTypeThis completes the process of configuring SharePoint application with Claims based authenticationChange the authentication for the SharePoint application
GO TO CENTRAL ADMINISTRATION AND GO TO MANAGE WEB APPLICATIONS PAGE IN APPLICATION MANAGEMENT.
- Click on the Authentication Providers and click on the Claims Based Authentication.
 4. In the dialog box, scroll the authentication providers and select Trusted Identity Providers.5. That will enable the ClaimsProvider which we have created in the earlier step.
- Select the provider and click Ok.
- Create a site collection in the web application.
- To add the site collection administrator, click on the People picker and type the complete the email address of the user.
- Now you should be able select the authentication provider from Windows Authentication and ClaimsProvider when you browse the site.
- You can remove Windows authentication from the Authentication Providers if you don’t need it.
No comments:
Post a Comment